


- 建立第一個 shell script
1 | touch echo.sh |
- 修改
echo.sh
1 | echo "Gmifly Blog is great" |
- 給予權限,不然下一步驟會有權限的報錯
1 | chmod 700 echo.sh |
- 執行 shell script
1 | ./echo.sh |
前言
在架設部落格的過程,一定會遇到很多瑣碎的事
我都選擇先跳過,把問題寫入大象筆記,列在 nice to have 的清單裡面
像在每次部屬靜態檔案到 S3 後,需要去 cloudfront 讓檔案失效,讓訪客可以即時看到更新後的 Blog
這件事手動做如下
手動讓檔案失效
在本地部屬靜態檔案到 S3 後,到 aws 我的 cloudfront 後台點選 ID

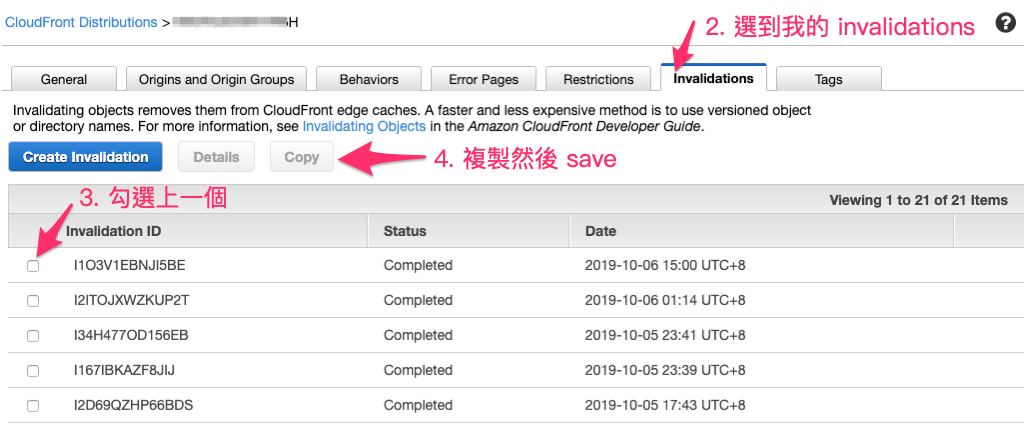
這樣看似簡單,但是反覆做了 10 次後,就會讓分享這件事感到麻煩…
Hexo Blog 一鍵自動部屬的 shell script
目的一行指令 ./deploy.sh
可以部屬完成,並且自動創建好「 手動讓檔案失效 」的功能
主要關鍵字: Cloudfront 、 create-invalidation
1. 首先安裝 awscli
參考:AWS 命令列界面
Mac 和 Linux 需要 Python 2.6.5 或更高版本。使用 pip 安裝。
1 | # 安裝 |
2. 設定 config 檔
1 | aws configure |
照指令處理
1 | AWS Access Key ID [會顯示曾輸入的 Key ID]: 輸入正確的 Key ID |
如遇到 parse config error 問題,應該是 credentials 的格式有問題
格式如以下,或者把 [default] 之後的都移除,格式參考:命名設定檔
1 | [default] |
3. 確認安裝成功
檢查版本
1 | aws --version |
測試看到 s3 bucket
1 | aws s3 ls s3://myBucketName |
4. 寫腳本 deploy.sh
#!/bin/bash
第一行指定最基本的 bash,這樣換電腦就算沒裝 zsh 也可以執行,一樣用 zsh 的朋友們,系統裡一定有 bash,這裡是執行時決定用 bash 而已,並且搭載 bash 相關環境M。
想要更深入理解可以看鳥哥文章:第十二章、學習 Shell Scripts
輸入這段 #!/bin/bash 就可以找到解釋
我查到一則使用 ruby 寫 script 的教學,連結我放在最下面
文章裡有一段最佳的註解:
The top line in this file is called a Shebang. It’s telling your shell in which language it should run the script, so it has to point to where ruby is installed on your machine.
/usr/bin/env rubytypically works.
set -e 如果中間任何一個指令噴掉,會直接中斷
參考:英文版、中文版、学习笔记:shell 中的 set -e , set +e 用法
部屬指令題外話一下,我是使用 hexo-deployer-s3 套件來部屬到 s3,安裝設定此處不贅述
1 | # 安裝 hexo-deployer-s3 |
查詢 aws cloudfront 相關的指令
1 | aws cloudfront help |
5. 完成的 shell script deploy.sh
1 | #!/bin/bash |
Ref
至於靜態網站教學可以參考以下
使用 ruby 写 shell